The warm weather has finally returned, so you know what that means: time to restain your outdoor wood. The right stain protects and extends the life of the wood and highlights its beautiful natural grain. Before you grab your sandpaper and brush, read on for the most common stain mistakes that we see so that you don’t make them yourself.
Mistake #1: Using a water-based stain
When it comes to choosing a type of stain, you have two primary options: water-based and oil-based.
One reason that some people choose water-based stains is because they dry quickly, so you don’t have to worry as much about dust and grass getting stuck on your project if you stain on a windy day. However, the water inside the stain absorbs into the wood, causing it to swell. As the stain dries, it often leaves the wood with an undesirable, rough texture.
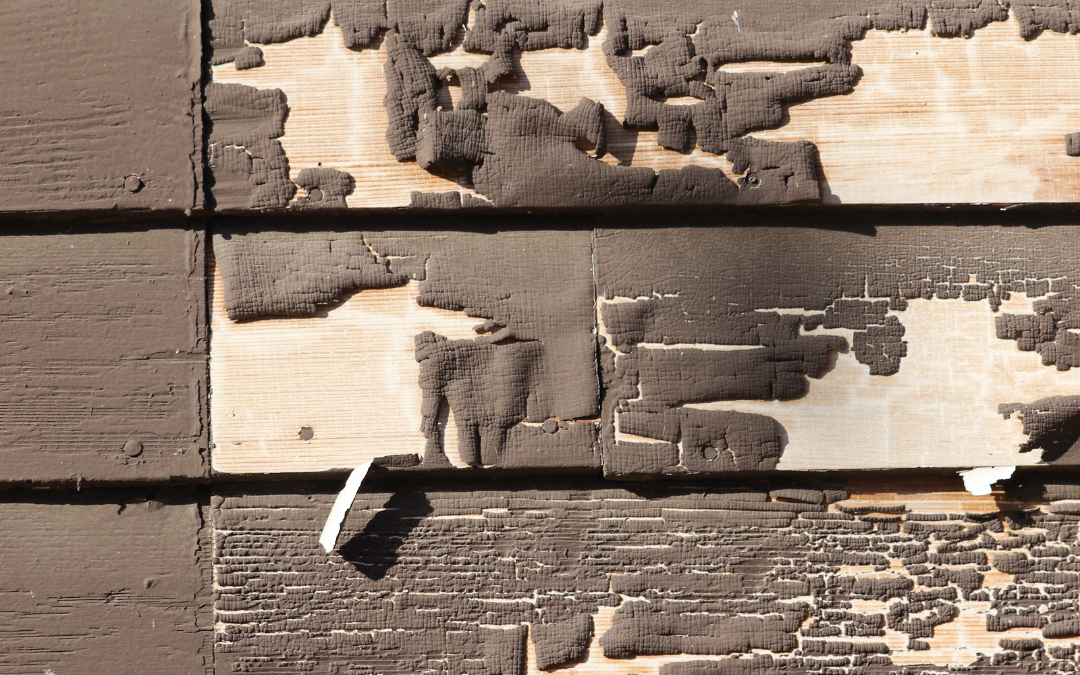
Interestingly, though water-based stains soak into the wood enough to make it swell, they do not absorb deep enough into the wood to adhere thoroughly. Because they sit atop the wood rather than soaking in, they’re much more likely to peel and flake.
Where water-based stain peels and flakes off, bare wood is exposed. Over time, the exposed spots develop a gray patina, which gives the wood “”leopard spots.”” To make the finish even again, you need to use harsh chemical strippers and a wood restorer before restaining.
Oil-based stains, like the proprietary brand that we use at Green Okie, penetrate deeper into the wood for a rich, beautiful, lasting color. The stain lasts three to five years, which is significantly longer than water-based. Also, it won’t peel, so there’s no need to sand before applying a new coat. You can save yourself quite a bit of time and elbow grease by choosing an oil-based stain over water-based.
How to avoid this mistake: Invest in an oil-based stain rather than a water-based one.
Mistake #2 – Not prepping the wood
We know you’re excited to get your staining project underway, but taking time to prep the wood first will help you achieve a much better result.
If you haven’t cleaned the outside surfaces in a while, then dirt, debris, and pollen could be sitting on the wood and will create texture in the stain. Rinse the surface off with a garden hose to remove anything clinging to the surface. We do not recommend using a pressure washer on your pergola, as it can damage the soft wood fibers and streak the wood.
If there are stains, mold, or mildew on the wood, mix a cup of bleach with a gallon of water and apply with a soft brush or cloth. Once you see the stains lighten, wash the area with soapy water and follow with a thorough rinse.
If you’re using an oil-based stain, there’s no need to sand the wood before applying a fresh coat. However, if you choose a water-based stain, you will need to sand, then hose down the wood again to get rid of the dust.
How to avoid this mistake: Thoroughly clean the wood before you begin applying an oil-based stain.
Mistake #3 – Not wiping off excess stain
To get the best results, make sure to brush excess stain to distribute it evenly. Then, wipe off any excess beyond what you can brush in. If you don’t, the stain can look blotchy and remain tacky.
How to avoid this mistake: Always wipe off excess stain after applying.
Mistake #4 – Not choosing the correct stain color
It’s important to get the color of your stain right so that it matches the rest of your outdoor style. If you’re changing your stain, test the new color in an inconspicuous spot so that you can see what it will look like when it’s dry. Don’t get too excited and stain your entire pergola before patch testing, or you may end up having to sand the stain off to try a different shade.
Keep in mind that you can’t go lighter with stains, only darker, and some of the character from the original shade will show through the new stain. For example, if you currently have the classic red cedar stain and want to try our new espresso shade, your result will be a darker, rich espresso color with hints of red.
Even when you restain with the same color, it will create a darker look. As the wood dries out over time, more pigment from the stain will float into the fibers, which makes it darker and richer. Make sure to patch test, even if you’re using the same shade, to be sure that you’re happy with it.

How to avoid this mistake: Patch test the new shade to ensure that you like the color before you stain the entire surface.
Apply stain like a pro!
Proper stain application protects your outdoor features from Mother Nature and brings out the natural beauty of the wood. Now that you know how to avoid the most common mistakes while staining, you’re all set to get it right on the first try!
If you need assistance selecting or applying a new coat of stain, don’t hesitate to reach out! We love to educate our customers and assist in pergola maintenance so that your outdoor oasis stays beautiful for decades.


Recent Comments